Coma News
Community
News
HOME > News
Working Instruction for Disco DGP8761 Thinning Machine
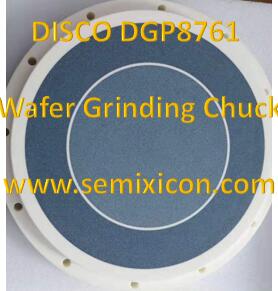
DGP8761 Wafer grinding chuck table, wafer carrier , grinding wheels are by CERAMERIC SEMIXICON
Applicable to precision thinning of semiconductor wafers and similar materials.
1. Equipment Preparation
1.1 Environmental Check
Ensure cleanroom conditions: temperature 22 ± 2°C, humidity 45–60%.
Verify no vibration sources nearby; airflow must be stable.
Confirm availability of electrical supply (200V/3-phase) and compressed air (0.5 MPa).
1.2 Equipment Startup and Initialization
Turn on the main power switch and start the control PC.
Run system self-check via touchscreen: “System Check”.
Confirm normal function of:
Vacuum system
Coolant circulation (use ultrapure water or specified coolant)
Pneumatic pressure
1.3 Consumables and Tooling Preparation
Grinding Wheel: Mount the specified SEMIXICON diamond wheel (e.g., #2000 for fine grinding). Ensure no damage and tighten securely.
Carrier: Clean the SEMIXICON vacuum chuck; check flatness of the ceramic plate.
Coolant: Ensure the filtration system is clear; coolant level adequate (recommend Disco F-GR300 series).
Wafers: Front side must be taped with UV film, free from burrs, bubbles, or contamination.
2. Processing Procedure (Example: Single Wafer Thinning)
Step 1: Wafer Loading
Place the wafer cassette onto the load port.
Step 2: Process Recipe Setup
Select a predefined recipe from the control panel. Key parameters include:
Tip:
· Rough Grinding: Use low-grit wheels (#320–#800).
· Fine Grinding: Use high-grit wheels (#2000+).
· Some applications may also require dry polish wheels.
Step 3: Thinning Process Execution
Click “Start” to begin automatic sequence:
Rough Grinding:
High feed rate to quickly remove material.
Leave a 10–20 µm margin for fine grinding.
Fine Grinding:
Reduced feed rate to achieve target thickness and surface finish (Ry < 0.13 µm).
Polishing Stage (if applicable):
Ultra-precise control to achieve surface roughness Ra < 0.005 µm.
Monitor real-time thickness sensor data (e.g., laser interferometer).
Machine automatically stops at the target thickness.
Error handling: If vibration or temperature alarms trigger, pause operation and inspect:
Wheel balance
Coolant flow
Step 4: Wafer Unloading and Cleaning
After processing, wafers are automatically cleaned and transferred to the DFM2800 or the load port cassette via T-arm or robot.
3. Safety and Maintenance Guidelines
3.1 Safe Operation
Wear ESD protective clothing.
Do not open protective covers while the machine is running.
In an emergency, press the E-Stop (red button).
3.2 Routine Maintenance
Daily:
Clean worktable
Check air/water pressure and flow
Check remaining wheel thickness
Weekly:
Calibrate height gauge
Check wafer surface roughness
Monthly:
Replace vacuum filters
Lubricate mechanical guide rails
4. Critical Notes
4.1 Grinding Wheel Management
New wheels must be height-calibrated and corrected.
Perform regular dressing to maintain wheel performance.
4.2 Wafer Breakage Prevention
For ultra-thin wafers (<100 µm), use special cassettes or inline handling.
After grinding, immediately apply support tape (e.g., peelable adhesive tape) to prevent warping or breakage.
4.3 Data Logging
Equipment automatically saves log files for each run (thickness, process time).
Surface roughness must be measured using dedicated metrology tools for traceability.
5. Shutdown Procedure
Ensure spindle stops before shutdown (warm-up stop if active).
Turn off main power, and close water and air alves.


 Preview
 Next
Next